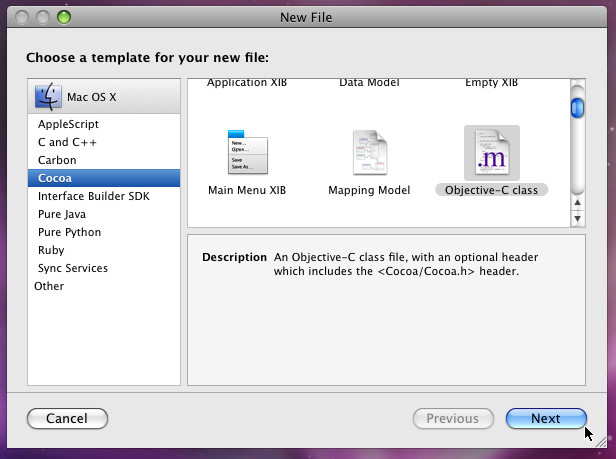
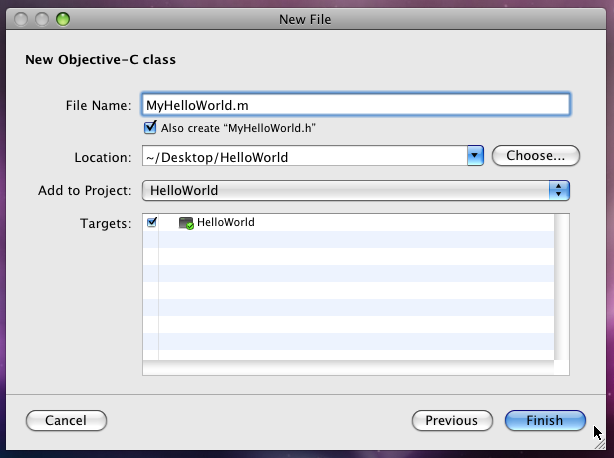
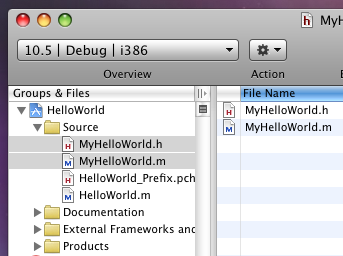
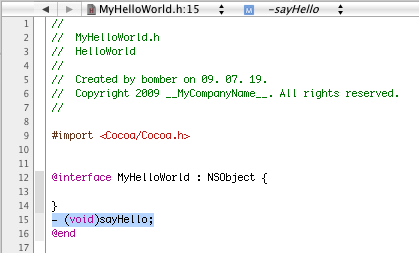
Launch Java Applications from Assembly Language Programs

Java Native Interface (JNI) is a mechanism that can be used to establish communication between native language programs and the Java virtual machine. The documentation for JNI and the technical literature on JNI deal extensively with interactions between the JVM and C/C++ code. The Java SDK even provides a utility to generate a header file to facilitate calling C/C++ programs from Java code. However, there is hardly any mention of Java andassembly language code working together. In an earlier article I showed how assembly language programs can be called from Java applications. Here I deal with the technique for invoking Java programs from an ASM process through a demo application that calls a Java method from assembly language code. The Java method brings up a Swing JDialog to show that it has, indeed, been launched.
Why Java with ASM?
JNI is essential to the implementation of Java, since the JVM needs to interact with the native platform to implement some of its functionality. Apart from that, however, use of Java classes can often be an attractive supplement to applications written in other languages, as Java offers a wide selection of APIs that makes implementation of advanced functions very simple.
Some time ago, I was associated with an application to collect real-time data from a number of sources and save them in circular buffers so that new data would overwrite old data once the buffer got filled up. If a designated trigger event was sensed through a digital input, a fixed number of data samples would be saved in the buffers so that a snapshot of pre- and post-trigger data would be available. The original application was written in assembly language. After the application was used for a few months, it was felt that it would be very useful to have the application mail the snapshots to authorized supervisors whenever the trigger event occurred. Of course, it would have been possible to write this extension in assembly, but the team felt that in that particular instance it was easier to write that extension in Java and hook it up with the ASM program. As I had earlier worked with ASM-oriented JNI, I knew this could be done and, indeed, the project was implemented quickly and successfully.
I am sure there are many legacy applications written in assembly language that could benefit from such add-ons. However, it is not only for old applications in need of renovation that JNI can prove useful. Although it may seem unlikely to some of us, assembly language is still used for writing selected portions of new programs. In an article published not very long ago, the author says, "I have found that many of Sun's partners still use assembly language in their products to ensure that hot code paths are as efficient as possible. While compilers are able to generate much more efficient code today, the resulting code still doesn't always compete with hand-coded assembly written by an engineer that knows how to squeeze performance out of each microprocessor instruction. Assembly language remains a powerful tool for optimization, granting the programmer greater control, and with judicious use can enhance performance." Clearly, in such "mixed language" applications the ability to use Java with ASM can be useful.
Note that the technique shown here can also be used to call Java code from languages other than ASM. If JInvoke is rewritten as a .dll, code written in FORTRAN, for instance, can link to it and call a Java method.
I have used JNI with legacy ASM code in two ways:
- Functional enhancement: Mail-enabling an existing ASM application, as mentioned earlier.
- Interface enhancement: Adding interactive user interface (mostly AWT, but some Swing as well).
These enhanced applications have run on Windows 2000 and XP. The Java versions used were 1.3, 1.4, and 1.6. In all cases the applications worked smoothly.
Recommended Downloads
The version of assembly language I have used for the demo code is MASM32. The entire MASM32 bundle is a free download, and if you are going to experiment with Java-ASM interaction, you will need to have it on your computer. A set of extremely useful tutorials on MASM programming are available on Iczelion's site. The definitive work on JNI is Sheng Liang's book The Java Native Interface: Programmer's Guide and Specification. This too is a free download. This article's Java code sample,AsmToJava, will obviously need an SDK (or, at least, a JRE) for execution. The assembly language part of the demo, JInvoke, has been compiled into an .exe file and will run even without the MASM bundle; the assembler/linker is required only if you want to modify the source code and recompile it.
The Basics
JNI provides a comprehensive interface to a JVM. This interface is exposed primarily through a rich set of functions. Native code can call these functions to interact with a JVM implementation. These functions are described in detail in Sheng Liang's book. While most of these functions can be accessed only after a JVM has been created, JNI also directly exports a number of native functions. As we shall see later, a function of the second type can be used to instantiate a JVM, so that other JNI functions can be called.
Once a JVM has been created, an assembly language program can access those JNI functions that need a JVM instance to implement their functionalities. Pointers to all these JNI functions are stored in a table, the Function Table. When the ASM code loads a JVM, it receives a variable named JNIEnv, which is really a pointer. JNIEnv points to a memory location that, in turn, contains the actual pointer to the Function Table. This chain of access is shown in Figure 1.

Figure 1. Access to JNI functions
As we see, each of the pointers to JNI functions is four bytes long. So the pointer to any given function can be found at the location defined by adding four times the index for that function to the starting address of the function table. The function indices are zero-based--the pointer for the first function is at index 0, that for the second is at index 1, and so on. In his book, Sheng Liang lists the index values for all JNI functions.
To call a Java program, ASM code needs to execute the following steps:
- Instantiate a JVM
- Locate the class
- Get the ID of the method
- Call the method
Before we look at these steps in detail, let us check out how we can use an include file to simplify the task of writing this and similar programs. As interactions between Java and native codes take place through the functions exposed by JNI, it becomes necessary for native processes to call these functions repeatedly. So we would like to use macros to take care of these activities. That would reduce the need for repeatedly writing similar (and fairly long) code and would also reduce the chances of bugs getting into the program through typos.
The Macros
Calling a function from ASM code involves getting the pointer to the function from the Function Table and then calling the function using that pointer. Getting the pointer, as we know, involves following the JNIEnv pointer chain to obtain the starting address of the Function Table and then retrieving the pointer to the desired function by using the index of the function. The first part--getting the starting address of the Function Table--would use identical code every time and can be handled by the following macro:
;This macro returns the pointer to ;Function Table in fnTblPtr GetFnTblPtr MACRO envPtr, fnTblPtr mov ebx, envPtr mov eax, [ebx] mov fnTblPtr, eax ENDMThe code shown above defines a macro that takes two parameters. The first is the JNIEnv pointer and the second points to the location where the macro will return the pointer to Function Table. The macro loads the pointer to Function Table intoeax, which is then saved in fnTblPtr. One way of using this macro would be to define it within the program itself. Another way, adapted here, is to define all such macros within an include file, which can then be used with the ASM program through an include statement. The include file used here is jav_asm.inc. This file defines not only theGetFnTblPtr macro, but also all the others that are required for this example. In addition to the macros,jav_asm.inc defines the prototype of the function that creates a JVM as well as the structs that are to be used as parameters with that function. Finally, java_asm.incassigns symbolic names to all JNI function indices to simplify their use.
Once the pointer to the Function Table has been obtained, the pointer to the desired function needs to be retrieved. The code for this too will be the same every time except for the index. The following macro performs this task:
;This macro returns the pointer ;to a function in fnPtr. GetFnPtr MACRO fnTblPtr, index, fnPtr mov eax, index mov ebx, 4 mul ebx mov ebx, fnTblPtr add ebx, eax mov eax, [ebx] mov fnPtr, eax ENDMThe macro multiplies the value of index by 4 and adds the result to the starting address of Function Table (available in fnTblPtr) to get the pointer to the function we want to access. This pointer is then saved infnPtr.
The three remaining macros are almost identical; the only difference is in the number of parameters handled:
;The next 3 macros push parameters as per ;stdcall and call the function through fnPtr CallFunction2 MACRO param1, param2, fnPtr push param2 push param1 call [fnPtr] ENDM CallFunction3 MACRO param1, param2, param3, fnPtr push param3 push param2 push param1 call [fnPtr] ENDM CallFunction4 MACRO param1, param2, param3, param4, fnPtr push param4 push param3 push param2 push param1 call [fnPtr] ENDMAs we see, these macros push the parameters (exceptfnPtr) in reverse order as required forstdcall, and then call the targeted function usingfnPtr as the pointer.
Now that the basic building blocks are in place, we can take a look at the four-step sequence followed by our demo application.
Creating a JVM Instance
JInvoke creates an instance of JVM more or less in the same way as the java command does when we launch a Java application from the command line. A Java virtual machine implementation offers a mechanism known as the Invocation Interface that allows a native application to load the virtual machine. The java command calls a C program that uses the Invocation Interface to run a Java application, andJInvoke uses this same interface. The code for loading the JVM is given below:
. . . va vm_args <> jvmo JavaVMOption <> . . . mov jvmo.optionString, offset opzero mov va.options, offset jvmo mov va.version, 00010002h mov va.nOptions,1 mov va.ignoreUnrecognized, TRUE invoke JNI_CreateJavaVM, offset JavaVM, offset JNIEnv, offset vaHere we first declare two structs. As we have already seen, these structs are defined in jav_asm.inc. The creation of a JVM requires that a number of parameters be specified. These are passed to the JNI_CreateJavaVM function through the structs.
In our example, we want to invoke the main method of the AsmToJava class. On my computer, the class file is in the C:\j2sdk1.4.2_05\testjni folder. The stringopzero defines this path in accordance with the method described in the JNI specs. Note that opzero is loaded into the struct jvmo, and then the offset tojvmo is loaded into the struct va. The last parameter passed to the JNI_CreateJavaVM function is va and, therefore, the JVM that is loaded comes to know where to find the class that we are interested in.
When JNI_CreateJavaVM returns, it signals success by returning zero in eax and failure by returning a negative number in eax. If the function succeeds in creating the JVM instance, the pointer to the JVM interface and the corresponding JNIEnv pointer are available inJavaVM and JNIEnv, respectively.
On return from the JNI_CreateJavaVM function,JInvoke checks the content of eax. If it is not zero, the JVM has not been loaded. The user is informed of this and the process exits:
.if eax == 0 . . . .else invoke MessageBox, 0, addr Fail1Text, addr Caption, 16; failed to create JVM .endif On the other hand, if the content of eax is zero, then a message box is shown (Figure 2) with the corresponding message and the next step is executed:
.if eax == 0 invoke MessageBox, 0, addr VmText, addr Caption, 64; indicate success
Figure 2. Message to show that the JVM has been loaded
I must point out here that JInvoke uses the simplest approach to JVM instantiation since it is meant to be a vehicle for concept demonstration only. A number of additional parameters can be specified, as is explained by Sheng Liang in his book.
Locating the Class
After loading the JVM, JInvoke needs to locate the class that is the entry point for the target Java application. The following code calls the FindClass function to do this:
GetFnTblPtr JNIEnv, fntblptr GetFnPtr fntblptr, FI_FC, fnptr ; ptr to FindClass CallFunction2 JNIEnv, offset ProcName, fnptr ; call FindClass .if eax != 0 mov classid, eax invoke MessageBox, 0, addr FcText, addr Caption, 64; class foundNote that the path to the class was earlier loaded into the struct jvmo (mov jvmo.optionString, offset opzero) and is already known to the JVM. If the FindClass function is able to locate the class, it returns the ID in eax. Otherwise it returns zero. Once the class is located, its ID is saved and a message box so informs the user (Figure 3).

Figure 3. Message to show that the class has been found
If the class cannot be located, then the process exits after showing an appropriate message. Figure 4 is an example of a message shown when a called function does not succeed.

Figure 4. Message to show that the class could not be found
Getting the Method ID
In order to call the method, the corresponding ID has to be obtained. The function that returns the ID for a static method isGetStaticMethodID. We use this function here since we want to call the main method of theAsmToJava class. The parameters for this function--in addition to JNIEnv--are:
- The ID of the class to which the method belongs; this is the
classidvariable referred to in the previous step. - The name of the method; this is the string
methodname. - The descriptor of the method that specifies the parameters for the method and its return type; the string
methodsigis the descriptor for our target method. In this case, the parameter is aString arrayand the return type isvoid. Sheng Liang's book on the JNI specification shows how to create descriptors for methods and for variables too.
The call to GetStaticMethodID is very similar to the other function calls we have seen so far:
GetFnPtr fntblptr, FI_GSMID, fnptr ; ptr to GetStaticMethodID CallFunction4 JNIEnv, classid, offset methodname, offset methodsig, fnptr ; GetStaticMethodID .if eax != NULL mov methid, eax invoke MessageBox, 0, addr GsmiText, addr Caption, 64GetStaticMethodID returns the ID ineax. If the attempt to obtain the method ID is unsuccessful then NULL is returned instead. So JInvokechecks the content of eax to determine whether to go on to the next step (Figure 5) or exit the process.

Figure 5. Message to show that method ID has been obtained
Calling the Target Method
The JNI function that calls a static method with the return typevoid (remember, we are calling the mainmethod) is CallStaticVoidMethod. The following code gets the pointer to this function and calls it with the required parameters:
GetFnPtr fntblptr, FI_CSVM, fnptr ; get CallStVM ptr CallFunction3 JNIEnv, classid, methid, fnptr; call CallStVMThe Java application displays a dialog to show that it has been successfully launched.

Figure 6. Java method successfully invoked
Once the called Java method returns, JInvokeexits.

Figure 7. Message to show that the process is exiting
When the ExitProcess function is called, all threads in the process are stopped, so the Java threads created by the process will also be stopped. Therefore, if this approach is used to launch a Java program, care must be taken to ensure that the called Java method returns only after completing all required activities. Actually, the issues involved in terminating the calling process and the JVM need careful attention. Please refer to the Windows API documentation and the latest JNI specs.
Conclusion
The approach shown here demonstrates the basic technique used for launching Java applications from assembly language code. Adequate error checking should be incorporated in native programs to ensure safe interaction with the Java environment. Sheng Liang provides many examples of checks including handling of exceptions in native code. ASM programs working with JNI should use such error checking methods wherever applicable.
The jav_asm.inc file provides an easy way of specifying JNI function indices. The use of symbolic names instead of numbers to specify an index is less likely to lead to errors. The use of macros, too, is useful in reducing errors. You are free to use this file with your code and also to modify it to suit your requirements. However, make sure that the file is not redistributed without the disclaimer.
When running JInvoke, you may get an error message saying that jvm.dll cannot be located. If this happens, you need to add the path to the directory containing jvm.dllto your PATH environment variable. This DLL is normally located in the jre\bin\client directory under the Java SDK root folder. For instance, on my computer, the path isC:\j2sdk1.4.2_05\jre\bin\client for the Java 1.4 release. If you are using Java 1.3, however, the folder would bejre\bin\classic. So make sure you've got the right path.
Finally, I would like to point out that the paths to the files named in the include statements ofJInvoke would be determined by the directory structure of your computer. The paths specified in JInvoke are valid for my computer. As far as JInvoke.exe is concerned, it will run even without any MASM component (specifically, any .inc or .lib file) being loaded into your system. If you want to modify the code and recompile it, you will have to make sure that the path details correspond to the way your directories are set up. The AsmToJava class file will have to be loaded in the directory specified byopzero. Alternately, opzero will have to be changed to reflect the path to this class. In that case, the source file for JInvoke will need to be recompiled, keeping in mind the need to modify other path names as mentioned above.
Resources
- src.zip: Source code forJInvoke and AsmToJava, JInvoke.exe, the AsmToJava class file and the jav_asm.incfile.
- "Invoking Assembly Language Programmes from Java Applications." This article provides supplementary information and explanation which may be useful.
- The Java™ Native Interface Programmer's Guide and Specification, by Sheng Liang.
- Iczelion's home page
'Computer Science' 카테고리의 다른 글
| 오픈 소스 클라우드 분석 (0) | 2011.11.22 |
|---|---|
| URL Rewrite : 동적 URL 지정 : creating Dynamic URL (0) | 2011.11.16 |
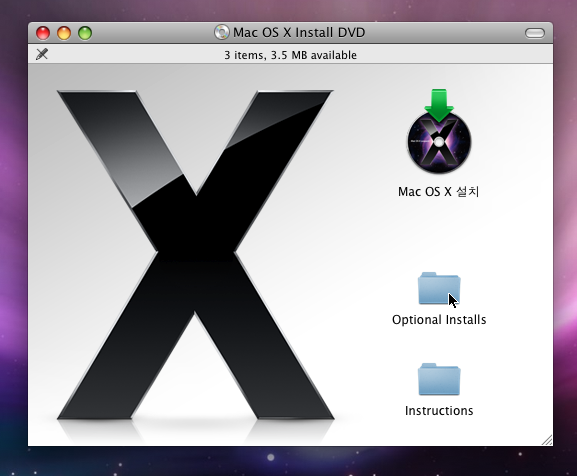
| XCode 간단 설치와 사용법 - Objective-C의 예제 개발하기 (0) | 2011.11.13 |
| Android : Source Code Overview (0) | 2011.11.10 |
| Java Spring 2.0 Web 예제(Hello World) (0) | 2011.11.09 |